
Overview
Client Invoicing turns approved time entries and site visits into client invoices — no separate spreadsheet, no re-typing hours anywhere. It's built for teams that bill someone other than an employer for work done: home-care agencies billing patients, families, or payers for visit hours; trades contractors (plumbers, electricians, handymen) billing homeowners for a job plus materials; or any company that tracks time at a client's site and needs to turn that into a bill.
The module covers the whole loop: set up clients and rates, let TimeLeaf attribute approved hours to the right client automatically, review and adjust a draft, issue an immutable invoice, send it by email or SMS, and — if you turn it on — let the client pay online by card, Apple Pay, or Google Pay.
Client Invoicing is an add-on available on the Professional plan and above, priced at $49/month. It's billed the same way as your other add-ons — see Billing in the admin sidebar to enable it. It also requires Shift Scheduling to be in use, since sites are what tie approved hours to a client.
Setting up clients
A client is the party you bill — a patient, a family, an agency, a homeowner, a property manager. Go to Clients in the admin sidebar (it appears once the add-on is enabled) to manage them.
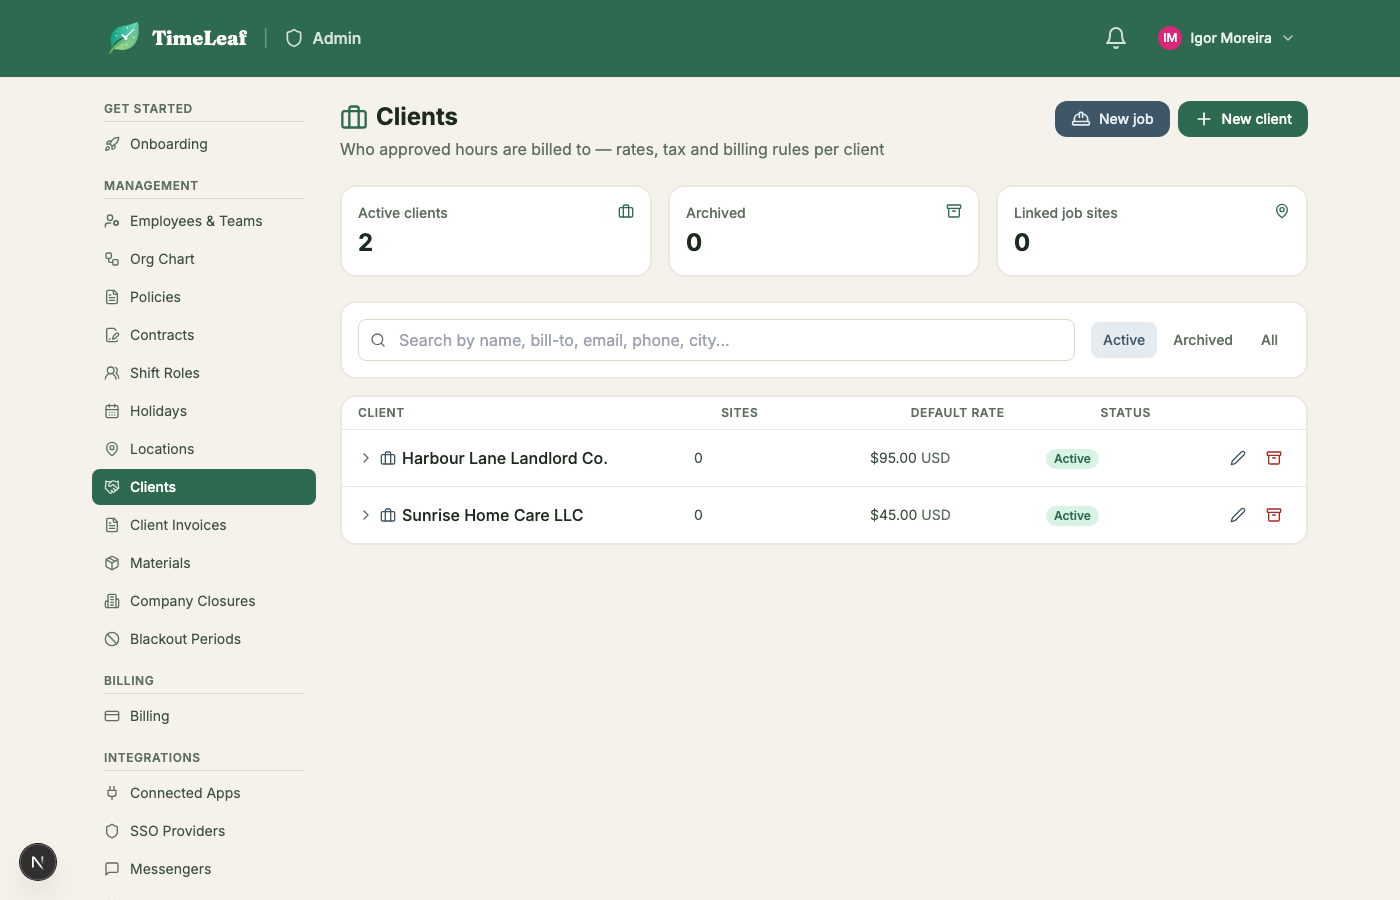
Creating a client
- Click New Client.
- Under Bill to, enter the client's name, bill-to name (defaults to the client name — useful when the payer is a family member or an insurer rather than the person receiving care), bill-to address, email, phone, currency, payment terms (in days), tax rate and tax label (leave the rate blank for tax-exempt clients), and any internal notes.
- Under Rates, set a default hourly rate. You can also set a rate per shift role (for example, a registered nurse bills at a different rate than a home health aide) and, separately, a rate per site.
- Under Billing rules, configure rounding, minimum visit length, and whether uncovered time is billed (see below).
- Save.
Rate resolution order
When TimeLeaf prices an hour on a draft, it checks rates in this order and uses the first one it finds:
- A site + role rate (this client's rate for this specific site, for this specific role).
- A site-wide rate (this client's rate for this site, regardless of role).
- A role rate on the client (this client's rate for this role, at any site).
- The client's default hourly rate.
If none of those is set, the line is left unpriced and the draft flags it — issuing is blocked until every line has a price.
Per-site rate overrides
A client can own more than one site — a landlord with several properties, an agency with many patients' homes, a property manager with multiple buildings. Each site can carry its own rate that overrides the client's role/default rates for work done there, set from the Rates section of the client form (or from the site's own form under Locations, which also lets you link a job site to a client in the first place).
"Same address as the client"
For a job site, the client form can turn on Same address as the client, which copies the client's country, state, city, and address onto the site so you don't enter it twice — common for home care, where the patient's home is both the site and the bill-to address. Turning it off leaves the copied values in place as a starting point; the timezone, map pin, and geofence stay the site's own regardless.
"New job" for one-off customers
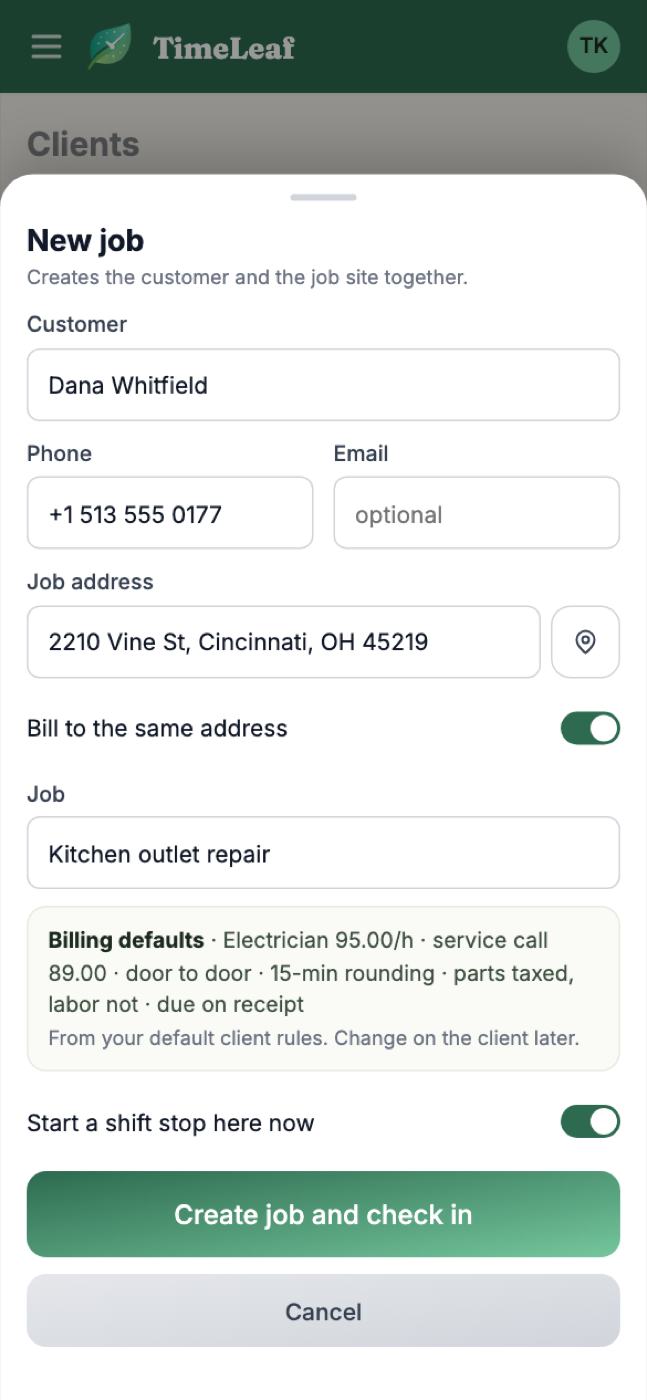
For trades work — a single job for a customer you may never bill again — the New job action creates the client and its job site in one step (bill-to defaulting to the name/address/phone/email you enter, address copied to the site automatically). Rates, tax, and billing rules can be filled in afterward from the client's own form.
Billing rules on the client
- Rounding increment: none, 6, 15, or 30 minutes.
- Rounding mode: round up (always favors you, the biller) or round to nearest.
- Minimum visit minutes: a floor applied per visit before rounding.
- Bill uncovered time: off by default (see below).
- Tax applies to: all lines, or materials only — set this to materials only if your jurisdiction taxes parts but not labor (common in US trades).
- Call-out fee: an optional flat fee added once per job (or once per visit day), separate from the minimum-visit floor.
- Material markup: an optional percentage applied automatically when a material line is priced from its cost.
Archiving a client (there's no hard delete) keeps its invoice history intact but stops it from being drafted against — use this instead of deleting a client you're no longer billing.
How hours become billable
TimeLeaf never invents an hour. Only approved time entries — the same ones that feed payroll — are ever eligible to appear on an invoice, and an hour is billed once, on one invoice, ever.
Here's how an approved entry gets attributed to a client and a site:
- GPS check-ins are the primary evidence. When an employee's shift has stops with check-in/check-out visits, TimeLeaf overlaps the visit's clocked time with the approved entry's clocked time. The overlap is the billable time at that site — this never bills more time than the employee was actually paid for, since approved hours always win over raw visit time.
- No visits that day → the shift plan is the fallback. A one-stop shift bills the whole entry to that stop's site; a multi-stop shift splits the entry by planned arrival/departure times, or evenly if no plan exists. Both fallbacks are flagged on the draft for review.
- No shift and no visit at all → unattributed. The hours show up under "Not on this invoice" so a manager can assign them to a site by hand, or leave them off.
- The role on the shift assignment decides the rate, not the employee's own profile — so someone covering a different role's shift bills at that role's rate.
What you'll see in "Not on this invoice"
The draft editor separates every approved hour that isn't billed into buckets, so nothing is silently dropped:
- Unattributed — approved hours with no visit and no shift for that day. You can assign these to one of the client's sites directly from the bucket.
- Uncovered time — clocked minutes a visit doesn't cover (drive time between stops, an unchecked tail at the end of a shift). Off by default per client; when a client has "bill uncovered time" turned on, uncovered minutes on a day billed entirely to that client can be included.
- Unpaid presence — a visit check-in outside any approved clocked period. Shown for visibility; never billed automatically.
- Sites without a client — visits at a job site that hasn't been linked to a client yet. Link the site from here to make its hours billable.
- Previously billed — hours already claimed by another invoice, shown with that invoice's number, so you can see why they aren't available here.
An hour flagged open visit (no check-out recorded), overlapping visits, or a geofence warning (checked in well outside the site's radius) still gets billed — these are advisory flags for you to review, not blocks.
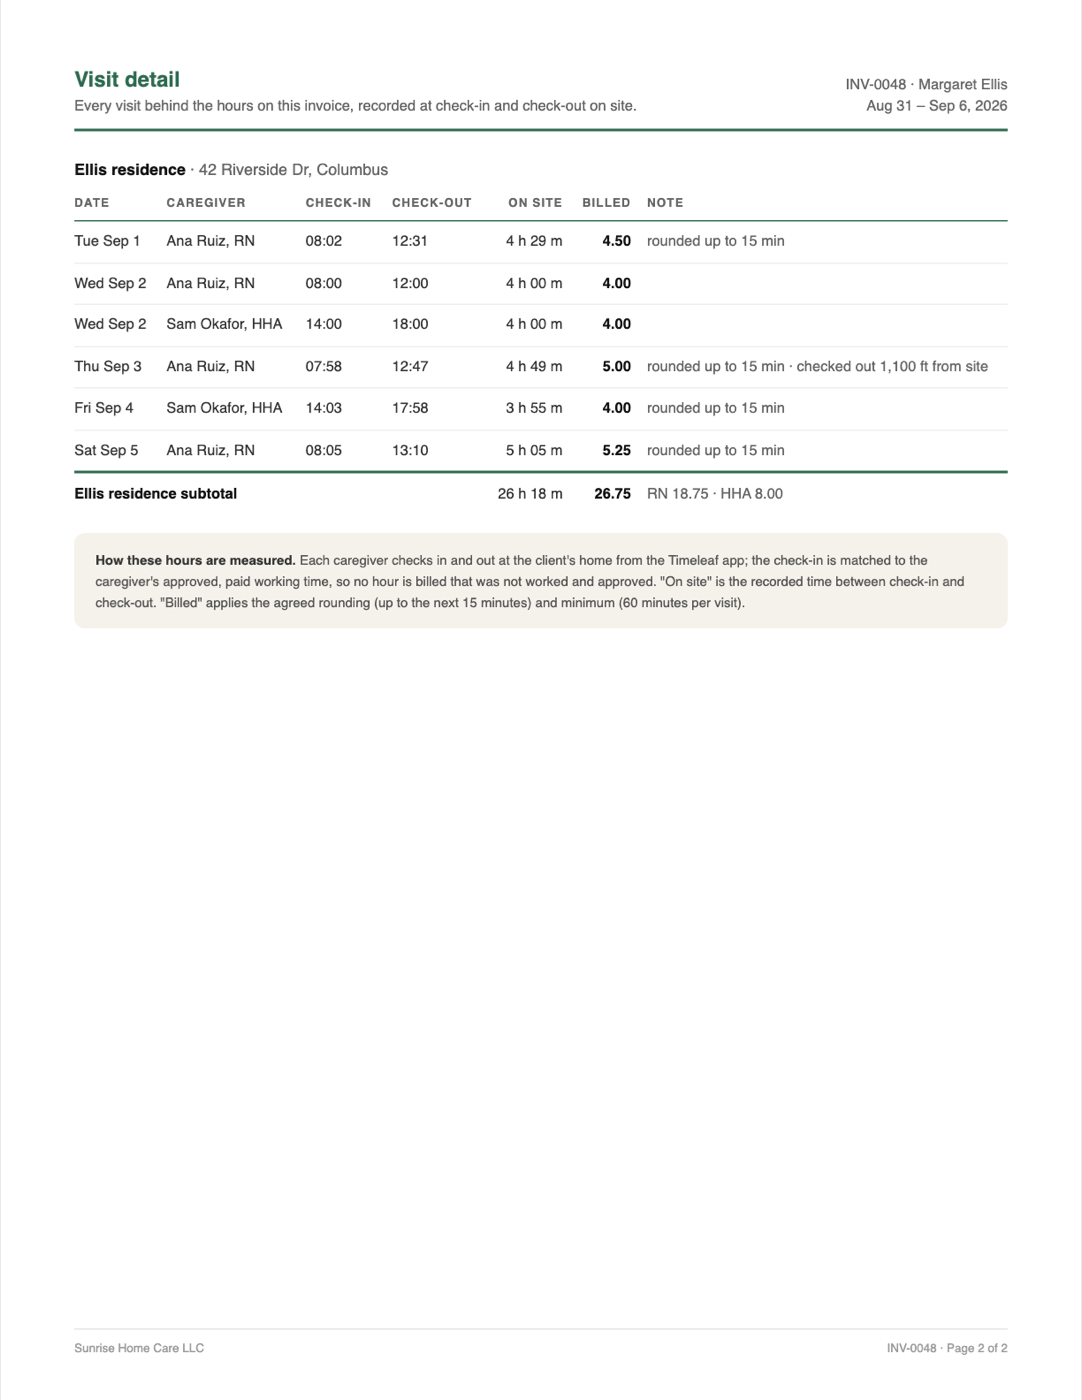
Every billed hour stays traceable back to the visits that made it up. A visit detail page (included on the PDF and linked from the invoice) lists each date, caregiver or technician, check-in/check-out pair, and how the raw clocked time became the billed hours:
Materials
Materials and other charges (parts, expenses, a flat "other" fee) can be added to a draft by hand from the invoice editor. If your team captures materials from the field (a description, quantity, price, and receipt photo attached to a visit), those land as pending lines on the client's next open draft automatically, where you accept or edit them before issuing.
Draft, review, issue
Creating a draft
- Go to Client Invoices and click New invoice.
- Pick a client and a billing period. TimeLeaf pre-fills the period as the day after the client's last invoiced period through the last fully approved week, and shows a live preview: approved hours found, across how many visits, and how many hours are still pending approval.
- Create the draft — TimeLeaf runs the attribution engine and lands you on the invoice editor.
Reviewing and editing the draft
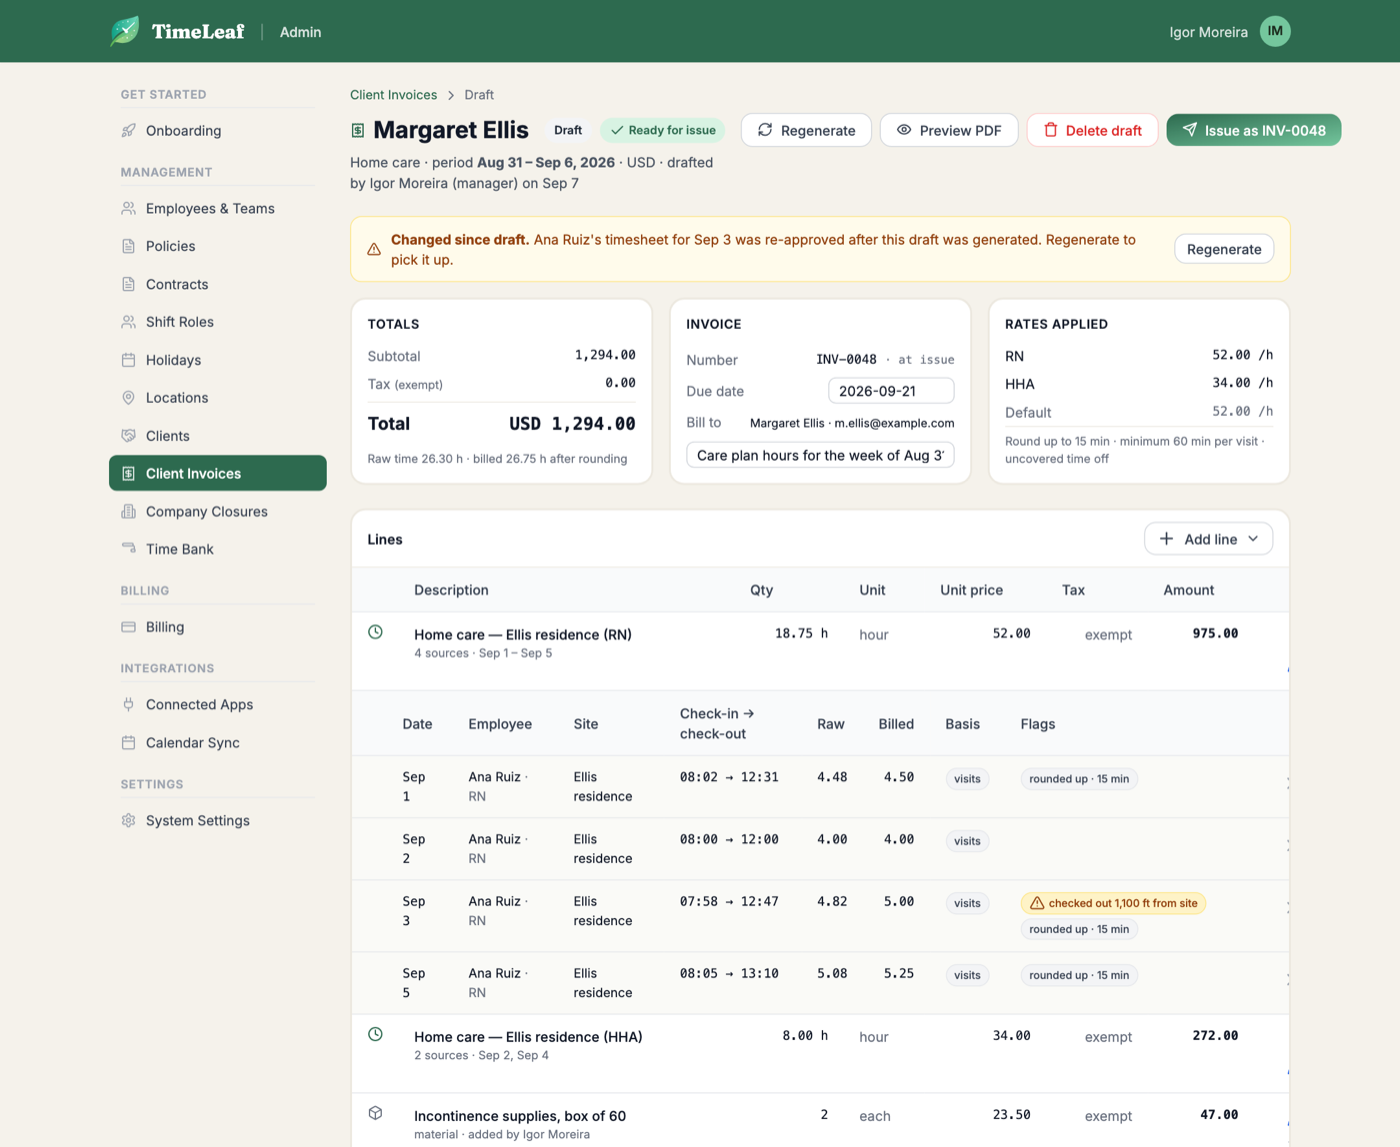
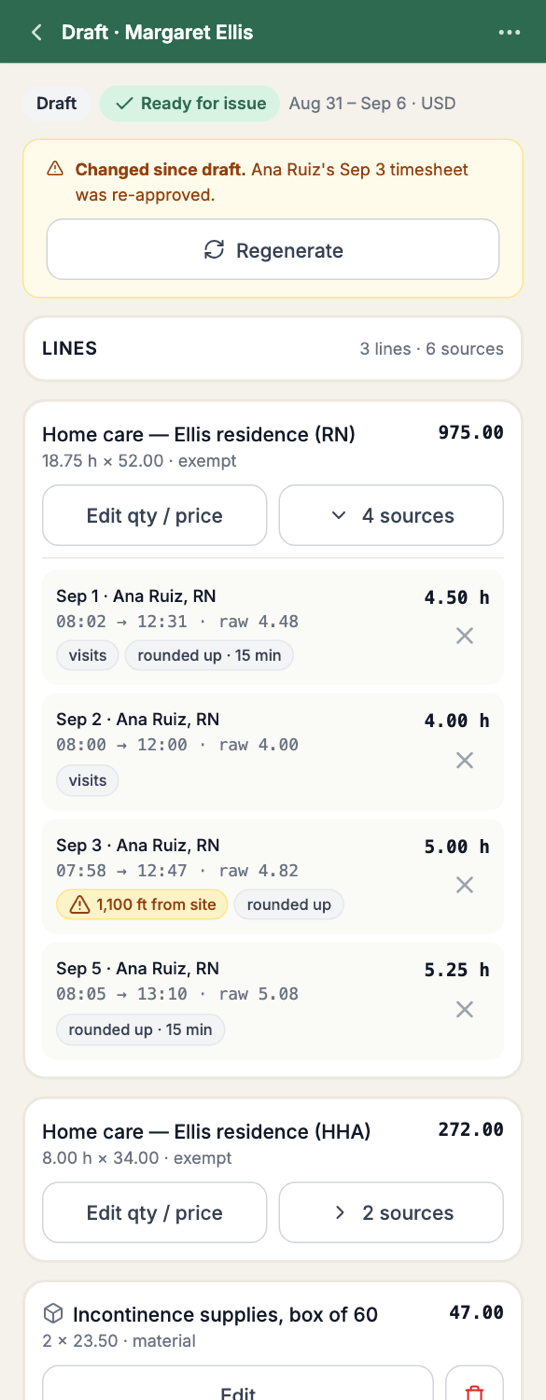
The draft's lines table shows one hours line per site/role combination, with quantity, unit price, tax, and amount — all editable inline. Expand an hours line to see its underlying sources: date, employee, site, role, raw hours, billed hours, the basis (visits, plan fallback, etc.), and any flags, each with a tooltip explaining the rule that raised it. You can remove a source from the line, which returns those hours to "not on this invoice."
Use Add line to add a manual line of kind material, other, or adjustment.
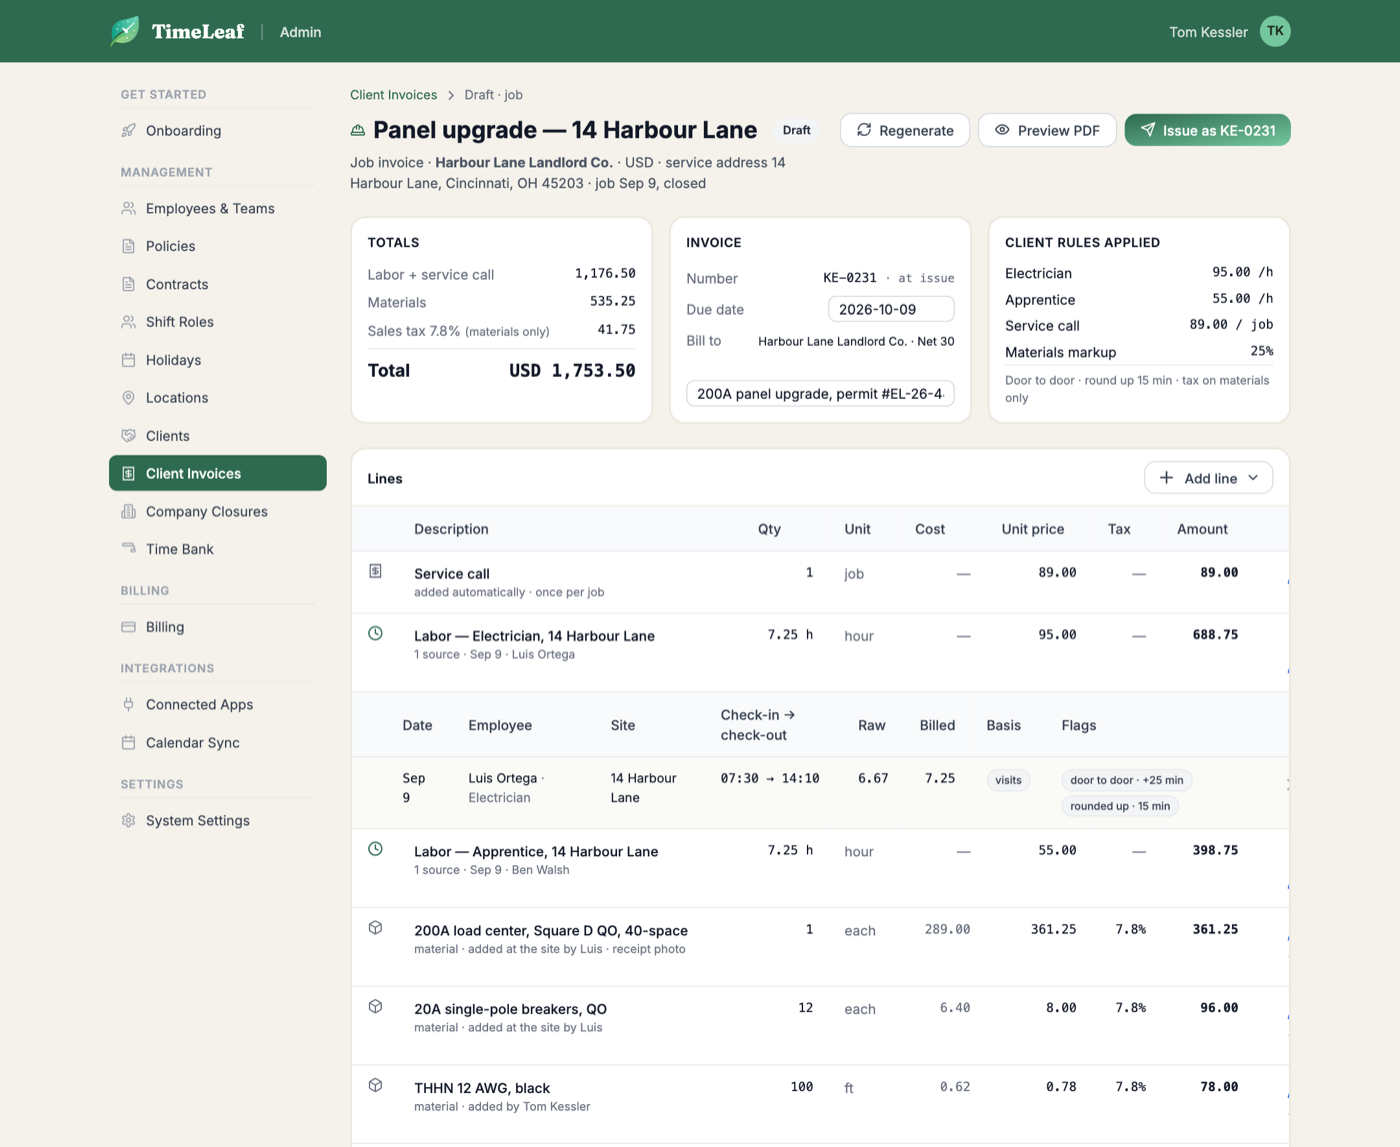
The same editor handles a single job instead of a date range for trades work — labor at each worker's rate, a service-call fee, and materials with tax applied only where it should be:
Creating a job and reviewing its draft works just as well from a phone, which matters when a crew is closing out a job on-site:
Adjustment lines and billing exceptions
Once an invoice is issued it's a permanent snapshot — corrections never modify it. If the underlying data changes afterward (a manager edits an approved entry, un-approves a timesheet, or deletes a visit that already fed an invoice), TimeLeaf detects the drift and records it as an open billing exception against that client. The next draft for the client surfaces these as suggested adjustment lines — a positive or negative line referencing the original invoice number — so the correction shows up on the next bill instead of retroactively changing a bill the client already received.
If a client has unresolved billing exceptions that this draft doesn't address with an adjustment line, the Issue confirmation warns you and lets you proceed anyway — it doesn't block issuing, since some drifts are intentionally left for a later invoice.
Issuing
Click Issue to open the confirmation dialog, which shows the invoice number about to be assigned, the total, and the bill-to email. Confirming:
- Assigns the next sequential invoice number for your tenant.
- Freezes every total.
- Renders and stores the invoice PDF.
- Records an audit log entry.
Issuing is irreversible — an issued invoice cannot be edited. If every line doesn't have a price (a client or role with no rate configured), issuing is blocked until you fix the missing price.
After issuing, an invoice can be marked Paid (with a date and optional payment reference) or Void (a reason is required; voiding frees the underlying hours to be billed again on a future invoice).
Sending and the public invoice page
An issued invoice can be sent (and later resent) by email — TimeLeaf attaches the PDF and records the send time and recipient. Sending, unlike issuing, is blocked if the client has no bill-to email on file.
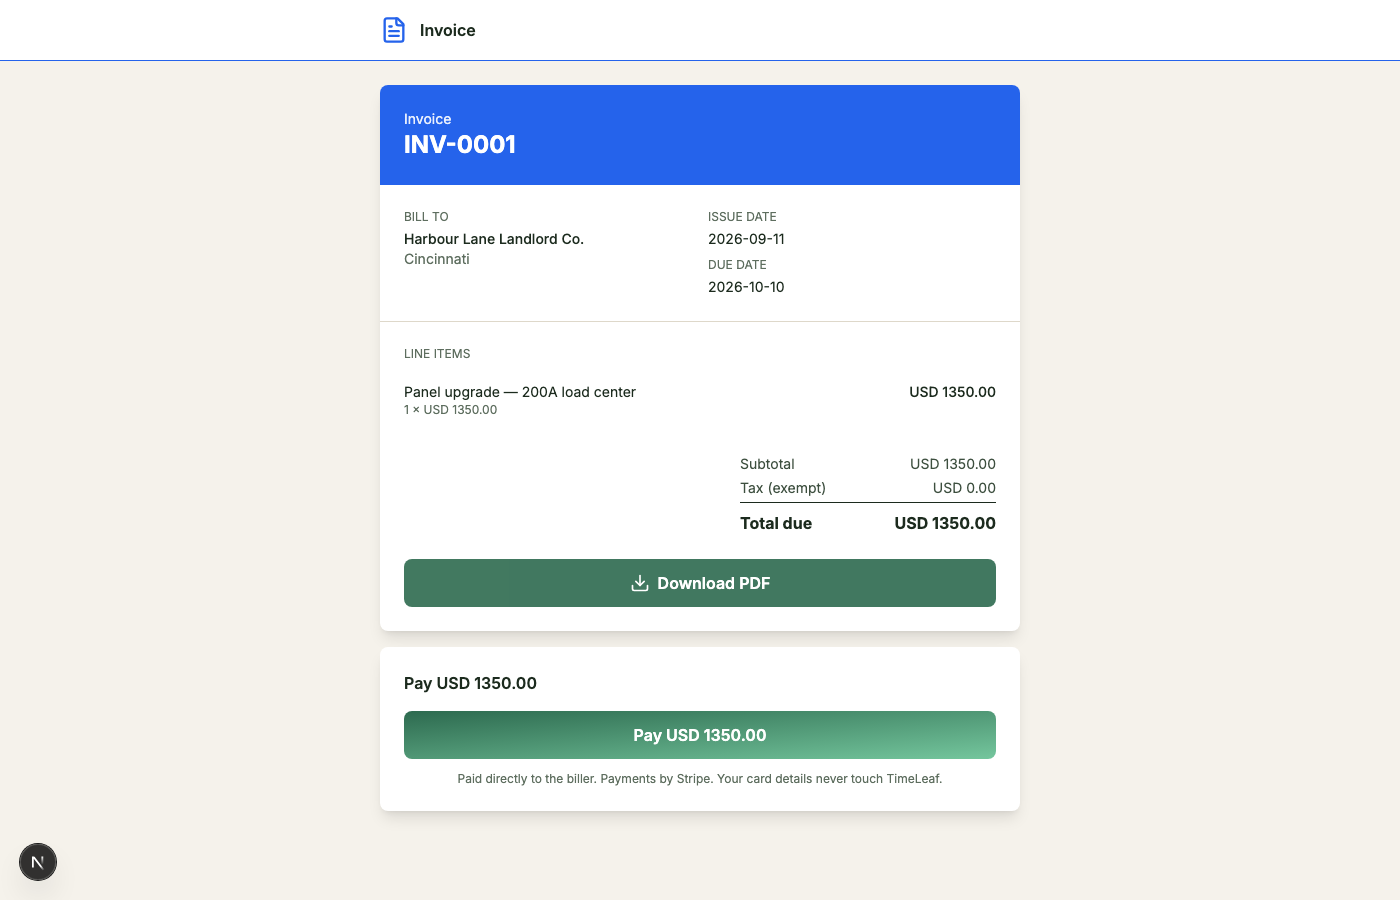
If SMS is enabled for a client, invoices can also go out as a short text with a link: "Invoice {number} · {currency} {total} due {date} · {link}". The link opens a public, no-login invoice page at timeleaf.io/i/{token} — the same content as the PDF (company header, invoice number and dates, bill-to, lines, totals, payment instructions), with a Download PDF button and, if you've enabled online payment, a Pay now button. The token is per-invoice and revocable from the invoice detail page if a link needs to be invalidated.
Getting paid online
Client Invoicing includes Stripe Connect payment collection at no extra cost beyond the add-on price — there's no separate payments SKU, and TimeLeaf takes no additional platform fee on top of what's already priced in.
Connecting Stripe
- Go to Billing in the admin sidebar and find the Get paid card.
- Click Get paid to start Stripe's hosted onboarding (Stripe Express). This asks for your business and bank details directly through Stripe — TimeLeaf never sees or stores them.
- Once onboarding is complete, the card shows Charges enabled and a Pay now button appears on your invoices automatically.
Stripe Express onboarding isn't available in every country; if yours isn't supported yet, the Get paid button is disabled and says so.

How a client pays
From the public invoice page, the client clicks Pay now, which redirects to a Stripe Checkout page hosted by Stripe — card, Apple Pay, and Google Pay are all available there automatically, with no card details ever touching TimeLeaf's servers. On successful payment, the invoice is marked paid and the payment reference is recorded automatically.
Payments are direct charges to your own connected Stripe account — you are the merchant of record, funds go straight to your bank via Stripe's normal payout schedule, and your business name (not TimeLeaf's) appears on the client's card statement.
Refunds
If you void an invoice that was paid online, TimeLeaf automatically issues a Stripe refund for that payment. If the refund itself fails (a Stripe-side issue), the void still goes through and the failure is logged and audited so it can be reconciled manually — voiding is never blocked waiting on Stripe.
Recurring drafts
For clients you bill on a fixed schedule, a client can be set to auto-generate a draft weekly or fortnightly. TimeLeaf creates the draft in draft status for review — it never auto-issues — once each period has fully elapsed, exactly as if you'd clicked New invoice yourself.
Accounting sync
If you've connected QuickBooks or Xero (see the integration pages under Integrations), an issued invoice gets Push to QuickBooks / Push to Xero buttons on its detail page (admin only). Pushing creates the matching customer and invoice record in your accounting system and stores the remote record's id on the TimeLeaf invoice, so a repeat push updates the same record rather than duplicating it. This is a manual, per-invoice action — invoices aren't pushed automatically.
Troubleshooting
Why can't I collect payment on an invoice? Either Stripe Connect hasn't finished onboarding yet (check the Get paid card under Billing — it will say "Onboarding in progress" and give you a Continue setup link), or your country isn't yet supported by Stripe Express. Until then, use Mark paid with a manual reference (bank transfer, cheque, e-transfer) — it's the primary path for payers like insurers and agencies who don't pay by card anyway.
Why is an hour missing from this invoice? Check the Not on this invoice buckets on the draft — it's almost always one of: unattributed (no visit or shift found for that entry), uncovered time (clocked minutes between visits, off unless the client has that setting on), unpaid presence (a check-in outside any approved time), or a site with no client linked yet.
Why won't Issue let me finish? A line has no price — check that the client, role, or site has a rate configured. Issuing is blocked until every line prices out; sending is separately blocked if the client has no bill-to email.
Why does the client's invoice show a different timezone than expected? Nothing to fix — a patient's home can be in a different timezone than the agency paying for it. The site's own timezone governs the visit day; the client's bill-to address is independent of it.